

|
|
|
|
|
| 10-02-2013, 08:05 PM | #1 |
|
Lieutenant
 229
Rep 458
Posts |
DIY iPhone 5s car mount
I recently got the new iPhone 5s with OtterBox case and wanted a clean way to mount it in my 128i without taking the case off. ProClip has some decent solutions but I didn't like the idea of blocking the vent as some of their mounts do. Not finding any off the shelf solutions I liked, I decided to make my own.
The main parts are:
Other items used were:
 I started by breaking off the suction part of the SlipGrip mount. The mount is obviously glued to the phone holder already and would be great if you could buy just that piece but I didn't check into that and just bought the cheapest option from SlipGrip.  Then I used the hand saw to cut the ball part off the back of the mount  I then used the 120 grit sandpaper to smooth the back of the mount and remove some of the remaining old epoxy  Then I took apart the swivel mount via the single screw in the center. Using the half of the swivel mount with the hole as a template, I marked where to drill the hole which allows you to reattach the two swivel mount parts once you epoxy the swivel mount the phone mount.  Now I was ready to expoxy the pieces together. Mix the two part epoxy, apply with something disposable (I used a wooden kebab squer) and apply the epoxy. Make sure to like up the holes nicely and then let it cure for the recommend time. I added extra epoxy around the edges to make sure it wasn't going anywhere.   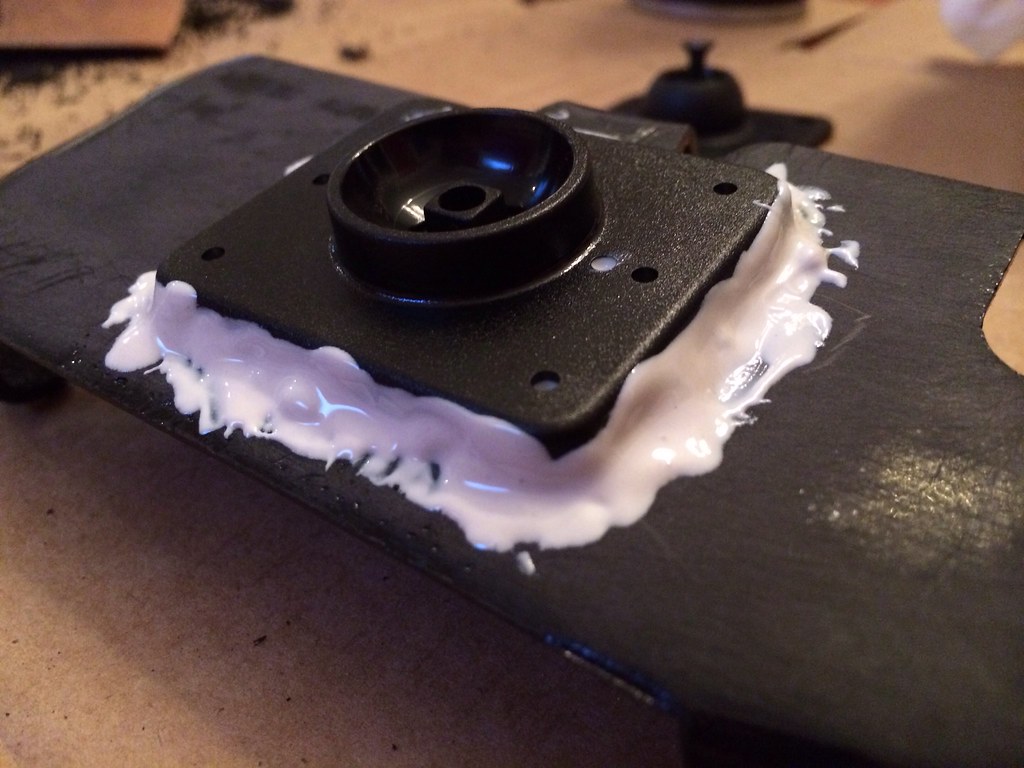 Once it was all cured, I taped off the inside where the phone sits and gave it 3 good coats of satin black.  While that dried I took the Kuda mount and attached the other half of the swivel mount using the 4 small self tapping screws that came with the swivel mount. I used a small 1/16" drill bit to drill pilot holes to help the screws get started. I was very careful not to over tighten the screw because of stripping them out of the leather/plastic Kuda mount.  Now the two pieces were ready to be put together with the single screw for the swivel mount. 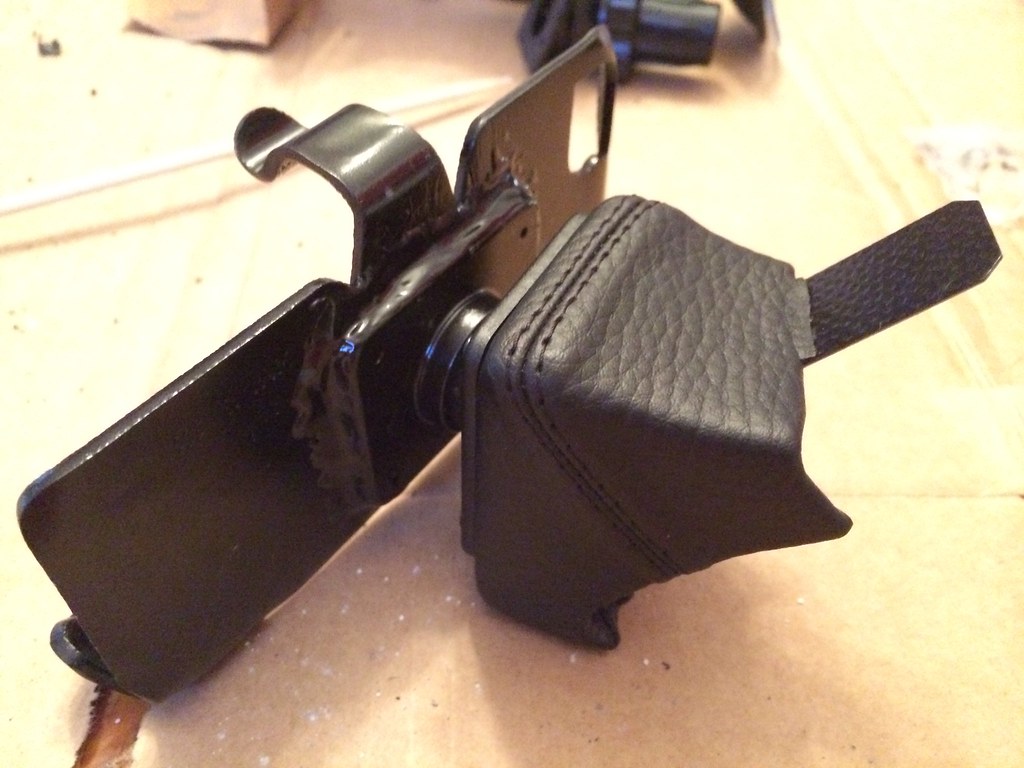  I mounted the Kuda mount as the instructions showed. It wasn't very difficult and you can slightly bend the small metal tab so it goes under the trim piece nicely. Once you get it positioned, bend the larger tab down over into the vent area and it becomes very solid. With the vent back in place it looks great and almost OEM.  The finished product 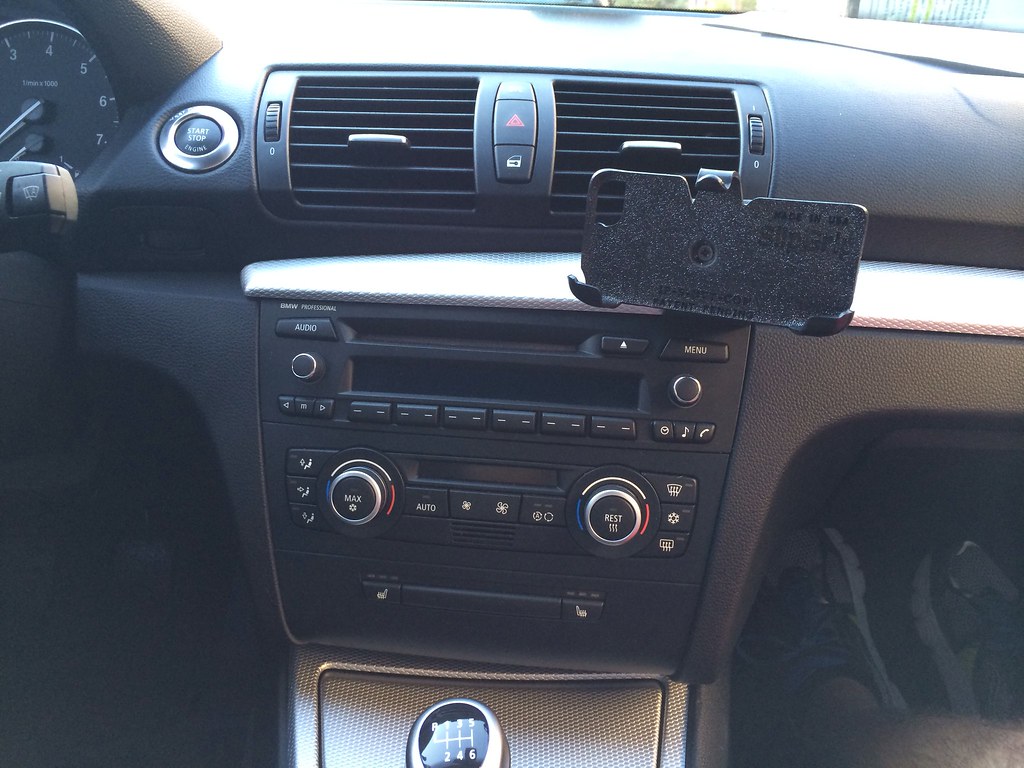   I haven't driven with it yet but I love where it sits. I'll probably rotate it so the phone sits in portrait. The can be adapted for any phone by buying the proper mount on the SlipGrip website or any other similar mount. I also might cleanly route a lightning cable and aux cable under the center console and out through the ash tray area but that's for another day. |
| 10-03-2013, 10:35 PM | #2 |
|
The Crowing

111
Rep 2,005
Posts |
Looks fantastic! Great write up!
__________________
 2009 135i : BMS JB4 G5 ISO,CXRacing FMIC Kit,Injen Cold Air Intake,Evolution Raceworks Charge Pipe,Walboro Inline Fuel Pump, E85 BMS Backend Flash w/ 60% E85,BMS Meth injection (trunkmount),BMS dual meth nozzles,Spec stage 2+ clutch w/ steel SWFW,BMS Catless Downpipes,Berk Tech Race Axleback |
|
Appreciate
0
|
| 10-04-2013, 07:38 AM | #4 |
|
Lieutenant
229
Rep 458
Posts |
Thanks!
After playing with it a little, the mount blocks the Menu button and dial below it when rotated to portrait view. I'm ok with that as I can't really remember the last time I've used those. It has proven to be rock solid even driving through crappy Richmond city streets. |
|
Appreciate
0
|
Post Reply |
| Bookmarks |
|
|


